Step 1: Urdu Nastaleeq Fonts Installer (v2.1)
Released 10th March, 2009
| اگر آپ یہ اردو الفاظ اسی طرح ٹھیک پڑھ سکتے ہیں جیسا کہ مندرجہ ذیل اسلام کے بارے میں جملہ لکھا ہوا ہے تو پھر اردو فونٹ آپ کے کمپیوٹر پر انسٹال ہوگیا ہے یا پہلے سے ہی موجود ہے ۔اس لئے آپ کو مندرجہ ذیل ہدایات پر عمل کرنے کی ضرورت نہیں۔ ۔ لیکن اگر یہ تحریر کا انداز ویسا نہیں تو آپ فانٹ انسٹال کرکے اس کو مزید نکھار سکتے ہیں۔ شکریہ اور جزاکم اللہ |

How to install Urdu Fonts on Windows |
اردو فانٹ کیسے انسٹال کریں؟ |
| If you are using Windows XP or Vista computer, you can download and run this program: Jameel Noori Nastaleeq Urdu Fonts Installer – click here to download. When you click, you will see the following popup window, please click on the Runbutton: | اگر آپ ونڈوز کمپیوٹر استعمال کررہے ہیں تو آپ ایک خوبصورت نستعلیق فانٹ یہاں کلک کرکے ڈاؤن لوڈ کریں اور اپنے کمپیوٹر پر اس پروگرام کو چلائیں تو یہ اردو فانٹ آپ کے کمپیوٹر پر انسٹال ہوجائے گا۔. جب آپ یہ ونڈو دیکھیں تو Run کا بٹن دبائیں |
 |
|
| and click on Run again if you get this popup window: | اور اب اگر یہ ونڈو دیکھیں تو پھر Run کا بٹن دبائیں |
 |
|
| after this click on Next button on this screen: | اس ونڈو پر Next کا بٹن دبائیں |
 |
|
| Next click on Install button: | اور اب Install کا بٹن دبائیں |
 |
|
| The Urdu Fonts will be installed after this step. Please restart your Internet Browser. Enjoy reading Urdu now! | اس کے بعد اردو فانٹس انسٹال ہوجائیں گے۔ اپنے انٹرنیٹ براؤزر کو بند کرکے پھر چلائیں۔ اب آپ اردو نستعلیق میں پڑھ سکتے ہیں۔ |
If you get a warning on Windows Vista that a program is trying to access your computer, please allow it to run so it can install the font. After this the font will be installed and you can close the window, and restart your browser or refresh/reload this page to view the text in newly installed font. If you install the font again when new update becomes available, you may need to restart your computer.
Other Operating Systems
If you are on Linux or other operating system which also supports OpenType/TrueType fonts, then you can manually download and install the ttf files from here. The zip file contains 3 ttf files. Please follow your operating system instructions on how to install these fonts.
Installing the Urdu Font on Apple Mac
Download the font zip file from here. Extract the zip file and double click the ttf files one by one to install. When you double click the font file, you will be presented with a small preview (written in the Roman alphabet) along with a button at the bottom that says “Install Font” as shown below:
 Clicking it will install the font.
Proceed to Step 2…

Step 3: Enable Unicode Urdu in Windows XP
If you are on Windows XP, follow these steps: (Note: this step is not required for Windows Vista/7/8)
- Click on Start, Settings, and then Control Panel

- Click on Regional and Language Options. (You may need Windows XP CD in your CD/DVD drive after this step)

- Click on Languages tab, and select first checkbox that says “Install files for complex scripts and right-to-left languages…”
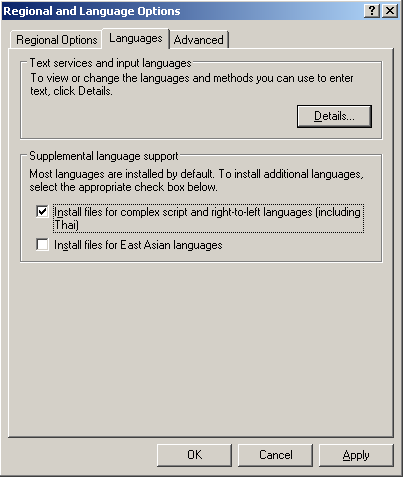
and then click on OK button. This will bring this prompt. Click OK button to continue:

- Now it will ask you for Windows XP CD in your CD/DVD drive:

Once you press ok and the correct CD is in the drive, it will continue with the installation like this:

- Next it will ask you to restart the computer. Select No at this time.

- Now click on the Details… button which will bring this window, which lists the currently installed languages and keyboards:

- Now click on the Add… button which will bring this window, where you will select Input language: Urduand Keyboard layout/IME: Urdu Phonetic 1.0 (this is the keyboard layout that we installed in step 2)
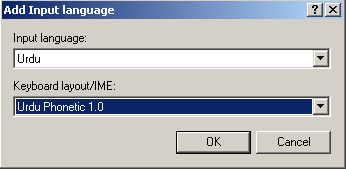
- Now press OK on all windows to close them. You can restart your computer now to load new settings. Once you have restarted, you can see that Urdu language is available in your taskbar as shown in this screen shot:

- Now to switch between Urdu and English, you can press Alt+Shift. Or on your taskbar you can see EN orUR and click on it to select the language.


